I am a Scottish glass designer working mostly in free standing architectural glass pieces. I use sandblasting to carve one off sculptural works later adding paint. My work is constantly evolving and this blog is a record of my glass creations.
Thursday, 22 April 2010
The first job I had to do regarding this was to take rubbings. I spent about a week doing rubbings alone of all the windows. First, when taking a rubbing, I lay the piece of glass face up on a light box. I then use a brush and a hoover to remove loose debris on the surface. Once this had been cleared I cut two sheets of tracing paper to size, to fit over panel with extra room for annotation. I tape down the edges so the paper is taut and secure. The first rubbing I do is the glazing copy, that's the good copy. On this all the lead sizes are to be me marked on, the height and width. This is done with heel ball, a black stick purpose made for blacking out the heels of scuffed shoes. The company called it Ball, Astral, Stick Wax and it really is better than anything else is to make these rubbing's, although a little hard to get a hold of these days. The lines on the inside and outside of the lead are to be scored on, so the lead lines themselves stand out clear. The purpose of this is that when you take the panel apart you know exactly how to put it back together again. The second rubbing is made with linseed
(Fig 20. Taking rubbings of St. Cross window 11)
oil and lamp black mixed together. This is then rubbed on with a sponge wrapped in a pair of tights. This is quicker but less accurate. It is the conservation copy that the glass will be laid out on and then leaded up on, so it will get more damage.
Once the rubbings were completed I was given a whole widow to restore. This included two large windows and two traceries. This was a very exciting project for me because I've never worked on anything this big and it's great to know that what I do will actually be put back in the church. I work on window eleven for the last few weeks I am at chapel. First I take apart the traceries. I use side cutters, which really look like wire cutters, to pull the lead away from the glass before snipping it. I work through the whole thing removing all the glass and laying it out on the conservation copy.
All the glass is then cleaned with de-ionised water, tissue and cotton buds. Some of the paint work is quite faded so I have to be careful not to remove any paint. I cut replacements for some of the border pieces that cannot be savaged, paint and fire them. I then copper foil the broken pieces, making the joins as slim as possible by trimming the foil with a scalpel. These are soldered and both (Fig 21. Image of one of two St. Cross Traceries ready for leading) traceries are set to one side.
The next challenge is to repeat this process on the large windows. My table is quite small so it is tricky to negotiate the space to de-construct the window. Once both large windows are taken apart and repaired, they too are laid to one side. These big windows took are really long time to fix up. About two and a half days to take apart and clean, then maybe a day to copper foil and solder, so more than a week to do both of them.
I then returned to the traceries to lead them up first. I was using 3/16th and ¼ inch leads with ½ inch border and a ½ inch lead at the bottom with an extra large flange on the outside so it can slip over another window. I had a bit of a false start to begin with because I was left to get on with it myself and didn't really know what I was doing. I found it quite hard to work out where each lead
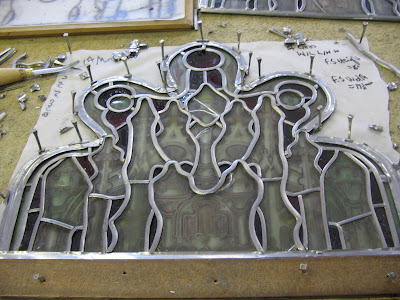
(Fig 22. Leading one of the traceries)
line went, started and finished. I guess this is something you just get to know the more you do it. After I got some guidance and took most of it apart again it looked better. I put in lots of long curved leads rather than breaking it up into different joints and it made the piece flow better. The glass was not cut that well, and the panel had gaps in places. The gaps can be disgusted and filled with putty, but Laura my mentor thought the reason they needed to be replaced so soon in the first place was because the gaps were there. She said having gaps like this where the glass isn't supported by the lead puts more pressure on the putty which makes it crumble and go sooner than it would otherwise.
The outside lead is Stillmans and it is very soft, getting lots of kinks in the ½ inch when you try to bend it. These can be flattened out again with an oyster knife, but you can still see it's a little uneven. Another brand is Heeps which, so I am told, makes the same lead only it is stronger getting less bent, the
(Fig 23. Both traceries completed)
downside being it is harder to cut. Bending the lead around the border of the tracery was hard and took a long time. There were very tight curves so I made joints and did it in sections. Once complete I soldered, making sure not to go over the heart on the border leads, so they can later be cut down or bent without difficulty during instillation. In some corners that had bad gaps I dribbled solder over to mask. After the first tracery was complete it was much easier to do the second one. They were the exact same so I could just follow the pattern the lead followed from the first. I did it much quicker and also felt I learnt lessons from the first one that I could implement in the next.
When I had completed the traceries to a good standard I was let loose on one of the big windows. It was a real challenge doing such a big piece but lots of fun and a really interesting
(Fig 24. Leading up large St. Cross window)
process. I worked from the bottom left upwards, making sure all the glass stayed within the lines. In places the glass was too thick and wide heart lead was used. To make the other lead meet this for soldering would be tricky because there was quite a step up. The lead adjoined to it was cut along the heart so the top flange could be peeled open this was angled to touch the wide heart lead so there wasn't such a drop for the solder. I used long strips of continuous lead in the window, so it flowed together better, and as a general rule I was told to also lead faces and hands with their own individual lead to frame them. It took me three days to finish. That is probably a really long time for a professional, but as this was my first time I was very happy with that. It was now very close to the end of my placement so I got to lead and finish of that first big window but not the second. It was still thrilling to have been able to do as much as I did.
So as a final note on Chapel Studio I found it to be one of the friendliest places I have so far been to. The staff were all very kind and welcoming and the work was very geared towards my personal learning and what would be good for me, rather than just getting me to do the grunt work, or be a part of whatever was going on at the time in the studio regardless of its educational merit. I think because it was such
(Fig 25. St. Cross window restored)
a big studio and big operation it was more able to cater to me, I never felt rushed or hassled into anything so I really only have good things to say about them. Urban Glass had a very different vibe and was a very different set up but I still felt very welcomed there and I enjoyed the work. These two placements therefore have been wonderful, the experiences were some of my best and I feel I have used the time well and come away knowing much more than what I went with.
Chapel Studios Continued....
The first thing I did was clean the broken sections of glass and tape them back together with magic tape (because it is low tack). I cleaned them using de-ionised water and cotton buds. I cleaned the edges with a dry (not wet as I was instructed in Holywell) fibre brush. I went over the edges a second time with acetone and a cotton bud. Some of the original glass was missing, perhaps it had been so turned to powder in the damage that it wasn't kept, or they had been lost over time. I went downstairs to the glass racks to match the colour of the glass, and from this I was able to cut two inserts. I painted them to match the panel, first guessing where the trace lines would have been and firing those, then attempting to copy the faded matt by scratching it to give the impression of erosion. The Ancient Brown paint was
(Fig 15. Image showing face panel to be restored)
mixed with vinegar for the tracing and Bistre Brown was mixed with gum arabic and water for the matt. Both were fired to 680C. Once fired I taped them into position.
To glue the panel back together I first covered the back of the glass with vinyl, then dental wax to give the glass strength and fix it in position. This also stops the resin from seeping out or the glass from becoming stuck to the table. The glue I used was araldite and I measured the amounts out by eye. The resin was coloured in the same way the silicone was in Chapel Panel. In Holywell we resined cracks by dabbing tiny dots of glue along the cracks, this would then seep into the crack and the same dot would have more glue added until the crack was full and the dot no longer moved. In Chapel they did it a different way, dragging a knife with the glue on along the crack to encourage the resin to flow into it. After a couple of days the glue was completely dry and I then needed to fill in the shales and air bubbles left on the opposite side. I didn't need the vinyl and wax this time because I was only doing a small amount and it would no longer be able to seep through but I put the glass on a piece of paper just in case so it didn't adhere to the tabletop.
It was important while filling in the back that the araldite was not too lumpy and stayed flush with the surface of the glass. That's because I was about to cut a duplicate from the same thin float glass I'd used before to go on the back. Because the glass was so thin the very tricky angles that the original thicker glass had accomplished became very hard to manage. On the first couple of attempts flies in the glass forced me to start over and when I asked one of my mentors to help she had the same problem. Eventually we managed to cut, what were practically right angles and I ground back the edges to make it fit snugly. I matted a very light bistro brown was on the back of the back panel. This was light enough that it didn't change the colour of the original panel but would remove the shiny reflective quality of the glass when completed. This is done so when the glass is in-situ people are not distracted by glints of light.
The studio had a larger flat bed electric kiln and I sieved whiting onto a section of this. It had to be quite thick because we were going to use it to slump glass. I took the original face and coated the back again with vinyl. I then added two sellotape handles to it so it could be picked up without touching the edges. This was then pressed into the whiting so the whiting took on the contours of the glass. The replica face was then placed into this shape to be slumped to form the same shape as the original. This way when they are later attached together they will fit perfectly without gaps. The kiln was still only taken to 680C but of course being electric it took a lot longer.
(Fig 16. Image of original panel restored)
I then set about cold colouring the original face on the front and the back. The vehicle that is used for the colour is a clear substance called paraloid B72. It comes in gel crystal beads which are stewed for fifteen hours or so in de-acetone alcohol until they turn to a liquid. This is a conservation resource that is also used in other types of restoration such as restoring marble statues. It is acetone soluble but waterproof. Chapel does not cold colour with acrylic paints like in Holywell, because they believe this is better and say it is more durable. It is mixed with pigment in powder form like the glues before and in this case a brown to mimic the original paint work. This is painted on everywhere the paint is eroded and once completed the effect is really startlingly better than before. The two separate pieces of glass were later plated together with silicone. I was very impressed by how well it could be fixed.
While restoring this face, as I mentioned before, I was also tasked with creating a duplicate. I traced the original and cut a piece of spare glass from the rack in a similar shade. I lay this duplicate on top of the original so I could look through the glass and so trace the design. First I copied the trace lines, with bistro
(Fig 17. Image of original with tracing paint copy)
brown and vinegar, which I felt I did quite well but some of my strokes were thicker in places than the originals and the tips of my strokes were not always sharp enough. After this was fired I painted a matt layer onto the head. I was shown how to age this by first letting the matt dry. Then spraying a plume of water into the air and waving the painted glass into it so that it picks up all the dots like light rain (apparently glass cleaner also works well at this if sprayed making a different effect). When you then work into this after it's dry with a scrub or stipple brush lots of dots show up. This produces an aged effect in this instance but could also be used in contemporary work.
In the end I fired on two different matt's using this technique because I wasn't happy the first time. I didn't feel my shading was quite right and I thought it was a little light so I did a second darker matt over the top. The result had more depth and shadow than the original, but I liked it for this. As we planned to fix the original I was allowed to keep the replica.
(Fig 18. Stippling matt replica to look like original)
I set about planning a border for it so the whole thing would be the size of an A4 piece of paper. I chose a wavy 70s sort of pattern and picked glass I thought complimented this. I cut and ground it and used the same dot matting technique on it as I used on the face so they looked like they belonged together. I made a mistake though and I fired it too high, about 100C out, when I lost track of time. Some of the pieces became warped and needed to be re-cut and they all needed to be repainted. When it was all finally done and fired to 680C I was very happy with the results.
I leaded my design together using ¼ inch round lead for the inside detail and ½ inch flat lead for the outside. I finger puttied it and polished it with a brush. I cleaned up the detail with tissue and cotton buds dipped in acetone. When this was done I added copper hooks inside the top lead so they were near invisible but could hang it. I am very happy with the results and am really proud of this panel because it was my own design and with it I had tackled a lot of techniques I'd never used before.
Fig 19. Image showing my finished design incorporating replica face
Award For Excellence - Chapel Studios
I worked on four main projects, Chapel Panel - restoration of an old tracery as a practise exercise, Face Restoration - the restoration of a shattered face from an unknown window, Face Copy - the replication of the broken face to incorporate into a new modern design, and St Cross - church restoration project where I helped to restore some windows. My experience at Chapel Studio was a good exercise in practising processes I was already familiar with and engaging in new methods of doing the same things. It is always interesting to see how a new studio practice differs from an old one. In this next section of the report I will take you through all that I have worked on breaking it up into separate projects so the information is more manageable. It is worth noting that in reality I was working on them all in tandem but for the purpose of keeping it bite-size I will start will Chapel Panel and work through in the order given above.
Chapel Panel was the working title given to the tracery Rachel had in storage at Chapel Studio. She did not know where it had come from, who made it or exactly how old it was, but it is likely to be Victorian. In the studio they have a collection of pieces just like this that have perhaps been left over from jobs or not wanted back because they are too badly damaged. I was tasked with the job of restoring this panel, however it was still meant to look old, so not restored to former glory but restored to something in between.
After Chapel panel was taken apart I cleaned all of the glass with distilled water, cotton buds and
(Fig 10. Image of Chapel Panel after Cleaning)
paper towel. Some of the paint was quite loose, much of it very faded and some non-existent. First I tried to replace these pieces of glass. I went downstairs and matched the old glass to similar colours in the racks at the studio. I cut this new glass to replace the old. I used paper to draw by eye the ghost impressions of where the paint had been and what it looked like to later replicate.
After I had cut these to fit together exactly, I painted them with the same paint mix only far waterier and blotchy so they were dark and light in different areas. This helped to give the effect of natural fading and eroding paint. To enhance this illusion I then stippled on top of the dried paint to further erode it. This worked well and looked really similar to the original paint work. They were made so the original glass would go on top and the new glass would be sandwiched underneath with the freshly painted areas facing upwards to meet the old glass so it would be more protected from the elements.
(Fig 12. Image shows original glass silicon plated on top of new glass)
Once fired I re-cleaned both sections of glass and taped slithers of magic tape to them to hold each paring in place. I then silicone glued them using 'Ace Silicones; Silcoset 153' to stick them along the edges. I was told I could also use a different silicone 'Bluestar Silicone CAF 3' which is more liquid and good for cracks. I used a knife to apply the glue and once the glue had dried I removed the tape and re-glued over the gaps. I was told it was very important that there be no gaps whatsoever because when putting the panel together putty can slip between the gaps in the silicone and slide between the glass layers making a mess. I therefore did several layers of glue before the segments were finally ready to use.
On less important areas I copper foiled cracked glass, trimming back the foil with a blade to the bare minimum so the soldering would be less visible. On more prominent areas I used silicone to piece back together straight cracks. I first cleaned the glass then taped it securely on both sides with magic tape over where the cracks were, completely covering them. I then cut along the crack line with a sharp blade one side, leaving the tape intact on the other, so that the cracks are able to flap open but remain held together. The tape is both sides including the side where it has been cut for a reason. When the crack is siliconed this tape will prevent the silicone going onto the surface of the glass because it could leave a residue that may scratch any paint during removal. The tape therefore acts as a barrier to the glue.
Once the silicone is made up it is dabbed into the open cracks which are then shut firmly and pressed flat against the table so all the excess glue squeezes out. When the glue is set the excess is scraped off with a knife and the tape is removed.
Urban Glass Continued...
(Fig.6. Shows me dismantling the broken quarry.)
While at Urban Glass I also worked briefly on other project, which was the restoration of a simple quarry window. Two windows and a tracery needed mending at St Mary's Church, Somerstown near Euston Station. They had been broken by kids throwing things at them and were in an area where they were likely to be targeted again. For this reason when restoring them John decided to use a larger lead than the one they came with so they would be stronger and more able to withstand future abuse. He used a Fein Tool osolating blade to remove the lead. This electric tool cut through all the lead very quickly so the window could be taken apart with speed. It could break the glass if you weren't careful however and isn't something that I imagine would be used on a window of importance. Neither the glass nor the lead needed to be kept though so it was a good tool to use. John was keen on it because the tool which had a flat circular blade span quickly from side to side rather than round in circles so it minimised dust.
(Fig 7. The Somerstown window being brush puttied.)
John used some of the original glass and also a lot of new glass. Once it was made I brush puttied it. He had it installed with somebody else but let me come and see it with him when he was putting the final touches to it. The window was in a U channel which is a channel in the wall of the church in the shape of the letter U. This type of channel is usually wider at one side than the other, so the window can be slid into the wider side then shunted across into the other to fit it. The flanges have to be bent down on the glass the outer edges to fit because it is a tight squeeze. An oyster knife is then used to straighten the lead back out again once it’s in because this will help to support it.
(Fig.8. This is an internal picture of the reinstalled window.)
The U channel is jammed with bits of lead to initially hold the window in place. It is also held with copper ties. Copper ties are essentially just strips of copper wire with loops in the middle. The loop has a blob of solder stuck on it and this is then melted onto the lead in the places where the panel meets steel bars in the window frame. These bars are tie bars and are there to support the glass. The copper is twisted onto the bars and this keeps the window in place while a mixture of lime mortar, sharp stone dust and cement is applied to the U tunnel blocking it up. Once hardened this is very hard to remove and it is serious work trying to release the window from the channel using chisels and round hammers.
I felt John also gave me some great advice. He said when going for a job you needed to be competent and accurate at cutting glass or there would be no point employing you. You must be able to follow a cut line perfectly first time and be able to demonstrate this with speed. If you can’t do this you will waste so much time grinding glass back to the shapes you should have been able to make in the first place. So cutting is very important to practise.
Tips for the future are to set up a PayPal account so when people come to look at your studio you can log them on to the computer right there and then and they can pay you. This is good because people don't tend to carry that much cash or have cheque books on them and if they leave they might change their mind. Get them to buy it straight away. He also said to get attention contact local papers to say you've an exhibition on – a run of 100 or something that sounds like it might run out. Try exhibiting in libraries and public places.
A final piece of advice is to get good at Photoshop. That way when entering competitions draw your design, then Photoshop it into a church with people walking by and looking at it. You can add designs like these of things you haven't done to your portfolio to bulk it out and show off your ideas.
I hugely enjoyed my time at Urban glass and found the experience rewarding. The next studio I went to was Chapel Studio in Kings Langley which is not very far from London. The Studio was set up by Alfred Fisher and Peter Archer in the 70s and is now run by Bob Holloway a partner in the business. During my time there I was under the instruction of Rachel Helleur and Laura Hobson who took care of me and showed me what to do. This studio does new work but mostly restoration and there was only restoration work being done while I was there. They have nine permanent members of staff and several freelance so there was always plenty going on.Award For Excellence - Urban Glass
John Reyntien's Urban Glass studio was set up by him around fifteen years ago, and unlike any of my other placements he does contemporary design work as well as restoration and he does not employ any permanent members of staff. The experience of this studio was also different for me because more so than any of the others my efforts there were solely focused on one project and although I saw John Reyntien create some of his own work and I worked briefly on a broken church quarry, my main drive was towards completing a single undertaking.
(Fig. 1. Patrick Reyntien reclining beside an artwork he created to demonstrate painting techiniques at Urban Glass)
John Reyntiens´ father, Patrick Reyntiens is one of the country’s most famous living glass artists and because he is now in his 80s, although still very able, John felt this was an apt time to start thinking about his father’s legacy. Patrick has enjoyed a long career, working on a diverse range of projects and with other important artists, and before he dies his son wanted to make a film about his life, chronicling his career and doing it at a time when his father would still be able contribute to it. I felt this to be a really fantastic idea and I could tell it was something John had really had to pour himself into and was very passionate about.
The fact is however that making a film, and John wanted it to be of high quality, would cost a lot of money. Once it is made he aspired to being able to sell it to a television network if possible, and certainly to sell copies of the video to glass enthusiasts. He was quoted a minimum of £26,000 for this project, although it may inevitably cost much more, and he therefore needed some means of funding it. Although a family trust was set up some years ago he felt he really wanted it to be an undertaking he had sole control over and so would need to raise all the money himself. In order to do this John had the rather fantastic idea of getting his father to create relatively cheap one-off pieces that he could sell to raise the funds. He would also host lunches where his father would give demonstrations and the public could meet the artist and buy his work. I helped at the first of these during my stay there and will give a more detailed account of it later in the report. Finally John will host a talk in April where people can view all of the art and by raffle tickets to win a one on one painting lesson with Patrick himself. All in all a very smart game plan in my opinion that I very much hope raises all the money he needs for the film as it would be wonderful to see.
The one down side to all of this is that John himself will not see a profit from any of this hard work, not at the very least until the film is made and he does have his own studio to run and bills to pay. My placement therefore was aptly timed because my free labour was very much needed and I feel much appreciated. During my stay I leaded and puttied over 150 of the 200 panels his dad had created at an average of seven a day. My presence allowed John to get on with his other work and it gave me the opportunity and privilege to assist on a project I have great admiration for and on the work of an artist whom I very much admire. Patrick himself was often in the studio. He would paint the panels, John would fire them, and I would lead, putty and clean them before John could finally add hooks, black up with zebu and photograph. We worked like our own mini production line. John was very focused on how we could best do things to speed things up and had lots of methods for doing this for me to follow such as not curling the solder because he believed it would waste time and leading several then soldering them all at once because this made it more efficient. These small measures don't sound like much but I think they did make a difference and as there was an awful lot for me to do in a fairly short space of time it made sense for him to get as much out of me as he could in the time that I was there.
I will now take you through the process in some detail of how I leaded up each panel. First I stretched several cames of 8mm round lead and 8mm flat lead in a lead vice screwed into the table. The table itself was a hard wood with a long sheet of white card nailed down to it for leading up on top of. The white was actually very helpful because you could see what the glass looked like when you put it down, rather than a dark wooden background as it would be without the paper, which stops you from seeing what you are working on.
I would arrange my bench with the lead all stretched and
All of this would be arranged neatly along my bench with everything necessary at arm’s length. Onto
Once they are all tacked on one side I remove the nails, glass and lead strips holding them in place and put all of these things neatly where they are supposed to be. I have found that it is extremely important to keep your working area completely clean and clear so you can always find things and tidy up as you go along. This being said I would next give the area a sweep to get rid of any lead scraps or dust. Once clear I would use the plastic tool to open the flanges on all of the leaded panels so they are ready to have the second lead added.
I would lay out the 8mm flat lead along the bench and flatten down the flanges along one edge on both sides with my oyster knife. So to look at it, it is open to the heart at one side and completely closed at the other. I would then lead the panels again with the folded side facing into the other lead so it fits into the round hearts open flanges. It was decided the double lead should be used like this on all the panels because it made them look like a more desirable item and gave a nice effect. It was purely aesthetic.
I worked the second lead around, following the joins of the first lead and mitring them. I again used the glass squares and lead strips to temporarily hold the panels in place while I worked. I wanted
Once this is done I solder the front of the panels in their entirety. John wanted me to solder in a stylistic way to give effect, using excessive solder so it was raised in lumps, with the gas iron. I would also solder places around the boarder where there wasn't a joint with these lumps so the panels looked studded. This was for aesthetics again so the panels stood out more, but it was also so the design appeared balanced. The panels all had different amounts of joints based on their individual shapes so some would have looked uneven, if say, all the joints had been on one side that was jagged and the other side being smooth needed none. Then it would not look symmetrical and the joints would really stand out. Instead I spaced extra solder around the borders of all the panels so they all looked similar.
After soldering one side I turned them over and soldered in the same place on the other side. I then scrubbed off the excess talo with a hard brush. Once several were completed I would spend a day puttying them on mass. Some were brush puttied others finger puttied. I used a hard plastic brush the scoop up leaded light cement straight from the tin and literally brush it underneath the lead. For the ones I finger puttied I mixed the cement with whiting until it was of a doughy consistency and no longer stuck to my fingers. Then I coaxed it under the lead by hand. It is hard to say time wise which is best. Certainly the brush is quicker at applying the cement, but it is also far messier and takes longer to clean up. I used a horse shoe nail to go around the edges on both to get off excess cement. I then rubbed whiting onto the surface to soak up oily residue. At the end of the day I would then brush off this whiting so it didn't get the chance to stick.
Once the cement was dry the next day I would go around it again with a nail to neaten up the edges. It was important that no cement should stick out from under the glass and that the lead should be properly filled with no gaps. If the cementing is not done well it looks messy, but it is also not watertight and so on an actual window it is very important to do it well.
This whole process was repeated many times in the exact same way with the exception of the slightly more expensive and more special additions of which a limited number were made. These also included a painted glass border and were larger. They were however put together in much the same way.